Monday, December 31, 2007

Painting and T-molding done


Well, I didn't get to do much during the Christmas break, but New Year's Eve was productive.

Today I was able to get the t-molding on... what a pain. But it does look nice. t-molding.com was able to get me two matching rolls of Galaxian Green (the previous 2 rolls sent to me were slightly different) and I lucked out in that they are almost an exact paint match to the sides.

I also got the GGG LED bar installed and it is BRIGHT! My only complaint is the 3" of wire they give you and it's very thin gauge... but I can work with it. I had a 12V harness from another project (8 AA batteries) that I was able to hook up to it and test it out with the marquee in place.

Tomorrow, weather/wife permitting, I plan on getting the Luminglas mounted in the front hole, wire up the speakers, mount the marquee (picked up the L-shaped molding from Home Depot and need to spray paint black), and mount the SmartStrip inside the cab.

I'm debating working on the bezel first or jumping straight to the CP. I have to admit the CP has me a little frazzled as I'm not good with electronics or drilling straight/vertical holes. That said, if I ever want to play this thing, I'm going to have to do it sooner or later...

Happy New Year, all!

Jim

Tuesday, December 18, 2007

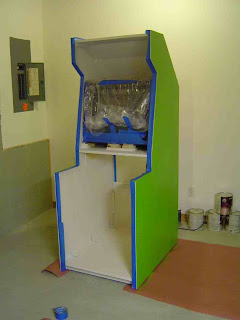
First coat of black paint on...


First black coat of paint is on... very thin, though. The foam roller still doesn't put much on the surface on the first coat... not really even the 2nd. It took 3 coats of the green before I started noticing a consistent color... an additional 2 coats before I was happy with it.


In the pic you can see the front of the cab with the circle cut out - that's where the green 12" Luminglas circle will be mounted... speaker panel is also being painted and to the right of the cabinet. I drilled some air holes in a nice little pattern on the top angled piece and you can see some blue tape on the back of the cab - that's a hole I cut out so I could access the monitor controls if necessary. I'm going to mount another speaker grille over it and it'll look fine.


I'm hoping to have the black coat completely done by this Saturday so I can put on the t-molding. After that, I'm going to mount the Luminglas, speakers, marquee, and get a monitor bezel completed. Then it'll just be the CP and PC.

Sunday, December 9, 2007

First 2 coats on the sides


This will be a two-tone cab, so I decided to start with the sides first - everything else will be black.


I'm using foam rollers which are working great BUT... I didn't realize the first coat would be so thin. The foam rollers definitely don't coat like a normal "fuzzy" roller for painting walls and such. After the first coat dried, I put on a second coat and the color really came out nice. I realize now that after sanding, it will probably take numerous coats to get the consistent color and smoothness. I'm not going for glass-finish, just smooth with no jaggies. (Definitely recommending the foam roller treatment to anyone preparing for this portion - the application looks nice and it doesn't have that textured look using 'fuzzy' rollers or brushes.)


Thursday, November 29, 2007

T-molding arrived


Got my order from t-molding.com in today - two 20' rolls of Galaxian green. I haven't decided yet if the sides of my cabinet will be painted an identical green or if I'll go a shade or two darker for contrast.

Saturday, November 24, 2007

Marquee received


Got all the putty done and the sanding and will be priming tonight. Hoping to get to the painting before Sunday. Also, my marquee arrived today from mamemarquees.com and it looks great. The cut is perfect, too. I haven't had a chance to test it yet but I want to prime the inside of the cabinet before I mount my LED strip.


Friday, November 16, 2007

2 new items ordered and received


I received two items today for my cabinet:


1. NovaMatrix™ LED Marquee Light - a bunch of super-bright LEDs that will light up the marquee from behind at the top of my cabinet.

2. TurboTwist 2™ Arcade Spinner Control - for games like Arkanoid, Tempest, etc.

That concludes all the items I need for the viewable area of the control panel. I've got my joysticks, buttons, spinner, and trackball. All that's left is the "innards" - control devices for handling the controls and sending the signals to the PC.

Sunday, November 11, 2007

Speakers installed and video/sound test

I'm learning that progress, for me, occurs in very small steps. I'm usually only able to do an hour or 2 (3 max) at a time on my cab, but now I can really start seeing the progress.

Today I got the speakers mounted and tested. Since I'm following the book closely, I ordered the Klipsch 2.1 system and the speaker grilles shown in the book. One of the images below shows the speakers mounted to the speaker shelf. Just like the book said, I had to countersink about 1/4" for the 1.5" screws to be able to grab. (I wasn't able to find 1.75" #6 screws like the book suggested.) This allowed the screws to grab and hold the speakers firmly. (And I've got to reverse the way I've mounted the speakers so the speaker cable is closer to the sides of the cab - in my haste, I missed that part.)

The good news is that the 8 screws I removed from the speakers were black and I was able to recycle them and use them to hold the grilles in place. No painting screws.

Finally, I hooked up the speakers and monitor to my laptop and tested the sound and video out. Everything looks awesome... and cranking the volume up to 8 gave me a Pac-Man experience I've never had before I can't wait to try out other games with these speakers.

Up next:

1. I've going to mount the front panel using barrel bolts (4) on the inside. If I remove the control panel, I'll be able to unlatch them and remove the front panel if I like. With the Luminglas mounted on front, I don't want the front panel to be able to open on hinges like a door. Using the barrel bolts will keep it locked in place but accessible anytime.

2. Filling in holes - I've got maybe a dozen or so holes to fill in and sand down before priming and painting.

3. Prime, paint, t-molding...

Saturday, November 10, 2007


Today I was able to cut down the speaker panel so it would fit properly above the monitor. I also started on my modification of the front panel. I long ago decided not to go with a coin door. I'm not building this for vintage accuracy and I don't want to rely on tokens (or a cheat button combo) to pay for a game. Instead, I've purchased a 12" diameter Luminglas circle (in green) that will be mounted flush from behind the front panel. A smaller circle (viewed from the front) will allow the viewer to see only the lightning effect and not the approx 1" clear edge around the effect.

There are 2 ways to do this, I've found out. The first is to cut out the inner circle first and then route out the back so the glass fits inside flush. The problem with doing this is once you cut out that inner circle, you've lost your center point to mount the little device that allows your router to cut a circle. The second method is to cut out the larger flush circle (about 3/8" deep into a 3/4" panel) so you keep your center point. The problem with this is that once you clear out the inner circle, there's not much wood left for the device used to cut a circle to rest on and stay flat with the wood. (This probably isn't making sense unless you actually see it).

I went with the second method, figuring I'd find a way to cut deeper into the smaller, outer circle. Long story, short - I did a little tweaking and used a longer pivot point nail, extended the router bit deeper into a second board clamped to the bottom of the front panel and I was able to get a perfect front circle.

Attached are some images... the lightning effect looks great in person. It looks washed out in the picture, but is very bright even in a lit room. I haven't actually mounted it to the rear of the front panel yet so it might look a little off center but I'll fix that.


Up next:

1. Wood putty all the holes on the cab in prep for priming.
2. Mount the speaker shelf using an alternative method from the book (I can't use braces underneath so I'll go above)
3. Mount the front panel
4. Order my marquee
5. Mount LCD light behind marquee area (I've ordered one)

Thursday, November 8, 2007

Marquee design


I've got a friend who's wife is a graphic artist and she's helping me to fine-tune my marquee, sideart, and CPO. This isn't the final marquee image, but it's getting there as we make little changes here and there. She took my original concept and greatly improved it - I love her version of the saucer and the "burning" effect applied to the lettering is very original and somethign I would never have thought of...

The biggest change? I've changed the title of the game from "Saucer Invasion in Sector-J" to simply "Saucer Invasion" - sounds more arcade-y anyway. The image here is low-resolution but the hi-res colors look much better.

What am I working on now? Well, I've managed to cut some small wooden pieces to raise my monitor in the front, providing it with a suitable angle for viewing by 2 players. Now that I've got the angle done correctly, I can move forward again. This weekend, I hope to get the following done:

1. Cut the speaker shelf down to size and test out placement of speakers and make certain they don't interfere (magnetically) with the monitor image.

2. Special Effect woodwork for the front panel. I have decided NOT to go with a coin door but have instead found something else I want to try. I'll hopefully have some pictures this weekend of my attempt.

3. If 1 and 2 get done, I plan on starting with some priming and sanding. Painting won't happen this weekend, unfortunately.

Saturday, October 27, 2007

Monitor installed...


Later this afternoon, I got the L-brackets installed for the monitor shelf... I also followed Saint's book advice and drilled from the outside cab sides into the support braces and put in a substantial amount of screws to keep those braces from falling... and the monitor.


Monitor is installed, but...


1. Speaker shelf is too long... will need to trim it quite a bit.


2. The monitor needs to be angled upwards a little... will need to experiment with placing some scraps wood underneath the front of it.

Got my monitor...


I've been having trouble deciding between an LCD or a monitor. Add to that the fact that the width of the inside of my cab is 26" and all of the 27" TVs I've found are slightly too wide. So, I decided to go a little smaller. Turns out that 25" LCDs are difficult to find in 4:3 Ratio... they all seem to be widescreen format these days.


Some more digging on craigslist.com found me a 25" Sony monitor. This thing is a monster... very heavy. The dimensions work (I'll have to cut some of the back off my speaker shelf, but no biggie) and the picture quality is outstanding. I connected my laptop and ran a few games on it to see and I'm definitely happy with this choice.

Now, I've got to reinforce the monitor shelf some more... did I mention this thing is HEAVY?!

It remembers its settings when power is lost and has just about every type of video input on the back (see image). No speakers built-in, but that's what the Klipsch 2.1 system is for...

Tuesday, October 9, 2007

Speakers arrived... and grills

Since I'm going "by the book" on this project, I ordered the Klipsch 2.1 speaker system. It comes with a subwoofer and 2 side speakers. A removeable volume and woofer control also comes with it (with a long cable so it can be located anywhere - trying to figure out where to mount it so it's hidden but easy to access). Got them off of eBay - they're normally around $150.00 but I got a perfect system for half that (shipping included!) and they work great.


I also ordered 2 of the 5.5" x 9" speaker grills from mikesarcade.com. They just arrived and look really nice.

Saturday, October 6, 2007

More work on the cabinet, part 2


Today I did the work required to mount the speaker panel and monitor panel. I installed the support pieces (hot glued to the side and pre-drilled before gluing them in). Those are visible in the first photo. They follow the angle of the that top edge.

The speaker panel was a tight fit and required some serious sanding to get it to fit.


Next, I printed out the templates for the Klipsch 2.1 speaker system - these templates are for mounting the two smaller speakers above the monitor (the subwoofer will sit inside the cabinet on the floor base).

The most difficult part here was just checking my measurements to make certain I had the templates placed properly. There's a limited amount of space for mounting the speakers so they don't interfere with the glass screen protecting the monitor.


Cutting the holes out with the saw wasn't difficult at all. You can't really see them in the photo but there are also screw holes at the four corners of each large hole that will hold the speakers to the panel.

Used a large drill bit to drill starter holes in each corner so I could get the saw blade going.


And the cabinet so far... the speaker panel and the monitor panel are only sitting on their supports and not screwed in yet - I'll need to remove them to paint and attach the speakers when that panel is finally ready to go in.

Need to buy a small flourescent light to mount inside the marquee area at top and start shopping for the monitor/LCD panel I want to put inside.

Tuesday, October 2, 2007

More work on the cabinet

Well, I've managed to get the back panels and the back angled panel installed. It's really starting to look like an arcade cabinet now.

The clamps in the picture were being used to hold the upper back panel in place until I could properly connect it to the sides of the cabinet (see picture below for notes on this step).

The gap you see there will be for access to the computer and inner components of the arcade cabinet. I haven't decided if I'll hinge the front door of the cabinet or not. There are some advantages and disadvantages.


What you're seeing here is a closeup of the mounting of the back angled panel and the upper back panel. I used these small pieces of wood as braces. I use a hot glue gun to attach them after I've pre-drilled them.


Everyone does things a little differently, but what I do is pre-drill the pieces first - I drill 2 or 3 holes in the side and these will allow me to place screws into the sides of the cabinet. I also drill 3 or 4 holes in the edges and these allow me to place screws into the angled panel and back angled panel (see next image for closeup).


Here you can see a closeup of the screws that will go into the upper back panel. I've already screwed the bracing piece into the sides of the cabinet.

Pre-drilling works for me because it's very difficult to drill those holes after gluing the piece in place. My electric screwdriver is small enough for me to get in there and tighten the screws down but the drill is too bulky.


Saturday, September 22, 2007

Back to the project...

My wife and I had a baby boy arrive in May which put my work on hold. Now that he's sleeping through the night and we've got a new routine down, I've been able to move forward again.

Last weekend, I cut the slot for the t-molding on both sides of the cabinet and mounted the cabinet sides to the base. This weekend I did some more work on mounting the top of the cabinet and the lower back panel. I'm following St. John's book VERY closely. Where the book may lack a detail or 2, I've been able to go to the byoac.com website and find the answer. There's a project there called "Mars Invasion" that follows the book closely, too. That project has a lot of pictures that have answered questions of mine.

Here are some photos of the work so far.
In this one, I've drilled the holes (using a countersink bit) so that I can sink the screws deep. I'll fill in the holes with wood putty later.


I didn't have a helper for this portion so I used my step ladder along with some scrap pieces of wood to prop up one end of the cabinet side until it was level. Then I clamped everything in place before drilling.


Here are the two sides mounted. They're wobbly, so I followed the book's instructions and used some L-brackets to secure them a little better.

Now it's starting to take shape and you can sort of see what the final cabinet will look like.


Used clamps to provide the lower back cabinet piece with a 3/4" recess. This recess will continue with the upper back cabinet piece, the angled back piece, and the top.


I went ahead and did the top piece next so the entire cabinet wouldn't be so wobbly. Even with the L-brackets, it needed more stabilizing. So the top was put in (using 8" strips of 3/4" for the top to sit on for stability).


And this is where I have stopped for tonight. Up next I've got to mount the angled back piece and the upper back panel. Then I'll put in the speaker shelf and the monitor shelf. Hopefully I'll have some time this week and next weekend to do a little more work on it.

Tuesday, July 10, 2007

Don't forget the arbor


As someone who wants all the information up-front, I feel I should let any visitors know that there is one additional part you will need to create the slot cut for the t-molding that will go around the edges of a cabinet. This isn't mentioned in the book and I had to do some searching to find one.
The piece in question is called an Arbor and you need it to use the slot cutter (see below post) with your router. Once again, I found it at Lowe's. Home Depot is only 2 minutes away from my home but, once again, they didn't have it. (Two strikes, Home Depot - I'm starting to see a pattern here.)
Anyway, here's a picture of what the arbor looks like. Be sure to buy one that matches the diameter of your slot cutter (either 1/4" or 1/2"). They run about $10.00.
Up next, cutting the slots in my cabinet pieces - this weekend.


Sunday, June 24, 2007

Slot Cutter for T-Molding


Tracked down a 1/16" slot cutter for my router. This is a hard bit to find! Found one at a local Lowe's for $16 (with tax). They're $20 + tax at Home Depot. So far, this has been my general experience with prices at Lowe's vs Home Depot. I'll use this bit to cut the slot around the edges of the cabinet so I can insert the t-molding.

In the image, the distance B is the 1/16 edge that will cut into the plywood.

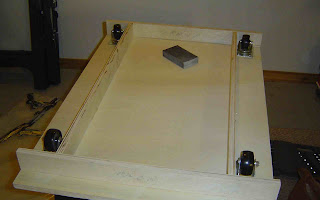
Base completed with casters


Got the base completed, including casters. I used 2.5" casters and as you can tell from the photo, there's about a 3/4" clearance. Took it for a spin in the basement area where it'll go and it rolls fine. And, miracle of miracles, it's level. The arcade cabinet won't tilt!


Saturday, June 23, 2007

Got the base built


Got the base built. Only one support piece isn't flush with the cabinet bottom edge but a little sanding will fix that. I've got the L-brackets to mount the cab sides but I want to cut the t-molding slot before connecting them, so that's my next step. Actually, the next step is finding a 1/16" slot cutter - may have to order it as I haven't found anyplace that sells it locally.

Tuesday, June 12, 2007

Smart Strip arrived


I just got my Smart Strip from bitsltd.net - it will allow me to plug in the PC to the "Control Outlet" - when the PC is turned on or off, power to the other devices (monitor, speakers, etc) is turned on, too... very convenient and a power saver.

Has built-in surge protection and spike blocking, too.

Sunday, June 10, 2007

Cutting the Cabinet Part 4


So, there they are... all the wood cabinet parts. I've wrapped the side panels because it was supposed to rain on my ride home, but luckily that didn't happen.


Everything is now unpacked in my own workshop and I'm ready to start assembling. A summary in case anyone is interested:


Started at 9am


Lunch at 12


Picked back up at around 12:45


Finished at 3pm


All in all, 2 man job took about 6 hours. I had fun... it's always good to spend some time with Dad in the workshop and catch up on things. More later...


Cutting the Cabinet Part 3


Dad had some great tools that I don't have, including a nice belt-driven sander. In a few of these images, you can see the control panel sides... we clamped them together and then gave them a quick run through on the sander. We were able to do this on all the various pieces that had matching pairs.


Also in this batch of images are the 2 control panel tops.

Cutting the Cabinet Part 2


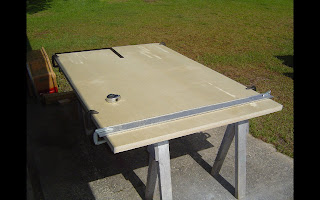
In these images, you'll notice that piece of long metal that looks like siding. That thing was invaluable. We would draw our lines, then clamp this metal guide 5.75 inches to the right of the line. This was the guide that let us use the circular saw with very good accuracy. The metal guide can be separated into 2 pieces for smaller runs.
The sander you see wasn't to even up the edges but to take off the little slivers that inevitably happened along the edge. Just one quick pass down each long cut and the burrs were gone.

Cutting the Cabinet Part 1

FINALLY got away to spend a few days at my dad's workshop to cut the cabinet pieces. I've been ordering my components, bit by bit, but this is the part I've been anticipating most. I'll post some pictures below with some comments and will continue posting images as I put together the cabinet...

First images here include the side panels being cut. My dad and I worked together with the rule of double-checking each other's measurements. The great part is that I made a few mistakes that he caught and I caught some of his... so going slow and measuring twice (and sometimes more often) definitely paid off and we made all the cuts correctly the first time and I didn't have to invest in more than the original 3 sheets of Sandiply.
Speaking of sandiply - this stuff was great to work with. Not too heavy. EXTREMELY smooth on the "good side" and DECENTLY smooth on the "bad side." There were ZERO snags/splintering of the edges and all pieces were flat and no warping. I've not worked with warped plywood before so I can't speak to how much work this might have saved me, but I can tell you it made measuring and marking the cutouts much easier.
In one of the images you'll notice that we clamped two sheets together. "Good sides" were placed together so that when we cut out the side panels they will be mirror images of one another and I can use the smooth side. This also saved time and I only had to draw one side panel on the wood. We used a circular saw set to 1.75 depth and it cut through both sheets easily. No sanding was required to "match" the sides. That said, it was very helpful to have two sets of hands and eyes to do this.

Thursday, June 7, 2007

Got delayed a bit...

This weekend my dad is helping me do the wood cutting. I'm going with a product called Sandiply (from Home Depot) - it's plywood, very flat, and sanded smooth on one side. I just don't want the hassles of MDF dust and weight and am willing to put in the time to prepare the wood so the final cabinet looks good. It costs about $7 more per sheet than MDF, but I think the smooth side combined with the lack of warp (common in plain plywood) will make it worthwhile.

I'll be posting pictures of the progress next week - including layout and cutting of the wood. I'll be doing this on the byoac.com website under the 'Project Announcements' section. Do a search for "Saucer Invasion" to find it.

Monday, May 14, 2007

Joysticks arrived


I got my 2 Ultrastik 360s from Ultimarc today. I also ordered the wiring harness for both of them so I won't have to do as much wiring. I plugged in one of the joysticks to the USB port on my laptop and ran MAME. I forgot to enable joystick control, but once I figured that out, I was able to run Pac-Man with no issues. My only (minor) issue is I think the joysticks are too "soft" and I may place an order later for the stiffer springs so the joysticks are a little tighter.

All in all, I'm very impressed. I placed my order last Monday and they arrive today, exactly a week later.

Sunday, May 13, 2007

Ultrastik 360s ordered


I've now ordered my two joysticks - I chose the Ultrastik 360 from Ultimarc for many reasons, but the main one being the ability to program it. I know there are other joysticks with this ability, but this type of stick also provides for attaching up to 8 buttons directly to the stick. I may not use that ability, but it's there if I want it. I also liked the fact that my email questions were answered very quickly. (As a matter of fact, all the vendors that I've used have been very pleasant and responsive to my questions AND getting my orders to me - I've listed all the vendors I've used in my Links section.)


I ordered them with the black bat top - there is no green option, so I'm going to have to either stick with black or find some sort of replacement or workaround. Ideally, I'd like green bat tops (versus round ball tops) but I can't paint them and so far I haven't found anyone who makes a suitable replacement.

Monday, May 7, 2007

NovaGems arrived today


14 pretty little green buttons arrived today. I may only use 12 of them and have 2 as replacements OR I'll use them all... not sure yet. The other buttons on the control panel will be black (including the Player1/Player2 buttons I recently ordered).