Saturday, November 29, 2008

More Work on Control Panel


Some major delays in getting my arcade finished, but I was able to get some work done over the Thanksgiving weekend. I finished drilling all the holes in the Lexan cover... then I had to route out some small square areas for the joystick and trackball brackets to fit in - they're now flush with the surface of the wood (sunk down about 1/16" to 1/8") - finally I drilled out the areas where the joy and trackball hardware will fit up under the control panel and connect to the brackets.

Up next, I need to paint the CP black, mount the CP overlay graphic, and then connect all the hardware. I'm close to having this thing done. The PC is ready and all the games are installed...

Sunday, August 10, 2008

T-Molding slot on CP and Chamfer Bit


Today I cut the slot around the Control Panel that the t-molding will fit into - because my CP is covered by 1/8" Lexan, I also chose to use a Chamfer bit with my router to shave a bit of wood off the bottom edge that is visible when the Lexan and t-molding are put on. The Chamfer bit cut the wood at a 45 degree angle. You can see in one of the photos here the slight edging done.

Saturday, August 9, 2008

Cutting the Lexan and Drilling Button Holes


Got a lot done today. First, as someone who is NOT a woodworking expert, I have to say I was pleasantly surprised by what I got done today. I've been dreading the control panel for some time, especially drilling the button holes and using a flush bit with my router to shape the Lexan.

Well, the LEXAN cut like butter - my feed speed was about 1" per second and there was no burn or melting. I used a double-flute flush bit with a pilot - I had ZERO clue what this pilot thing was until I just sat down and examined what I needed to do and how this bit would help me. I hope that one of my images here will help someone else in my shoes - it shows that the pilot (a little silver spinner at the end of the bit) is rolling against the 3/4" plywood and the blade is cutting the Lexan. I just had to figure out how to properly clamp the pieces and give myself a gap between the CP and the spare pieces of 3/4" I used to support the Lexan that would become waste.

I know a lot of people have said that using a portable-drill-press-plunger (the kind that attaches to your electric drill) isn't the best way to go, but it's all I actually own. I don't have room (yet) for a full size drill press, so I pulled out the device, attached my drill, put the Forstner 1-1/8" in the chuck and used my center marks on all the holes for accuracy. I had to put a little more energy into pushing down on the drill, but it worked and my holes came out great (I used a spare piece of plywood on the bottom to prevent splintering).

Tomorrow I'll use these holes as pilot holes to drill the Lexan button holes. I also drilled to holes that will hold the trackball plate in place (I'm going to route out the plate space so it is flush with the CP surface). I inserted the trackball plate just to make certain all my drill holes were dead-on and they were... so I know that using the trackball plate as a template for routing my trackball hole will be perfect with my CP overlay.

Had fun - the afternoon went too fast but I did a lot of "measure twice" type work and took my time. I should be able to do some more routing tomorrow - I'm anxious to get this CP done! I've got all my electronics now, so it's coming together...

Tuesday, July 22, 2008

Software for creating Control Panel

While creating my control panel, I wrote a small tutorial on how to use Inkscape, the free OpenSource graphics software I used. It's a 2MB color PDF file (zipped up) that can be downloaded here.

Monday, July 21, 2008

Control Panel Overlay


I got my control panel overlay (CPO) completed and ordered via mamemarquees.com - it looks great. It's on a heavy vinyl and the colors are nice and vivid. I also have my control panel template (CPT) printed that will help me with accurate drilling.

Sunday, June 29, 2008

Slot cut and Chamfer for the Control Panel


I'm going to wrap a piece of green t-molding around the control panel and the Lexan protective cover. This will require me to shift the slot I cut into the side of the CP up 1/8" (to make up for the extra thickness of the 1/8" Lexan). Unfortunately, this will also leave a 1/8" wood gap below the t-molding. To hide this, I'll be using a Chamfer router bit to cut an angle into the wood (see image). Since the CP will be painted black, this should make the underside of the CP less visible.

The slot for the t-molding will also have to shift up 1/8" inch so it will now be cut 1/2" from the bottom of the wood using the 1/16" slot cutter bit.

Saturday, June 28, 2008

Control Panel design


I'm finishing up the control panel which has been my biggest holdup on this project - it's got a lot of woodworking involved, including some special routing and drilling. Here's a draft image for the button layout and the joysticks.

Also, I'm posting two images for the control panel overlay - these aren't 100% and I'm not even sure one of them will be the final overlay graphic, but I think you'll get the idea. The green trackball will light up and will be inside the central saucer.

Tuesday, June 24, 2008

Back to work...

Today I purchased a sheet of 24" x 48" Lexan... this will sit over the control panel and (hopefully) protect the graphics underneath it. I'll have about 12" of width on the Lexan as waste, but I can use this to test my drilling skills through this material.

I was told that Lexan will get scratched over time - to prevent this, they add about a US$60 fee to make it "scratch resistant" - not buying it. It just makes it more difficult to scratch, but not scratch-proof. Considering this 24x48 piece cost me about $30 I can afford to buy 2 more pieces over the years if I have to and just redrill the holes.

I also bought a great little router bit that will help me cut out the recesses for the joysticks and trackball mount plate (so they mount flush with the wood). I'm hoping to get started on my control panel this weekend and get this project finished by end of summer. I got sidetracked by a little 1 year old boy who has been learning to crawl, then walk, and now talk - totally worth shelving this project for a few months or more. But ready to get back to it...

Saturday, February 2, 2008


Business was crazy for the start of the new year, so the month of January was a bust for getting anything done.
I was able to get the bezel template cut and then transferred it to a black 1/4" foam board. The foam board is from Elmer's (the glue people) and was 32" x 40" for only $5.50. Just cut it with a box cutter.


I've found a couple of glass shops nearby that have given me some nice quotes on tempered "smoke glass" - I'm going to run out this next week and check them out before purchasing, but I'm hoping to have the glass in my possession for insertion next weekend.


I took other people's advice and finished my cabinet BEFORE touching the Control Panel. Now the motivation to get the CP done is high and I'm ready to start.

Wednesday, January 2, 2008

Test Run


Hooked everything up for a test run... the marquee lights up, the Luminglas works, speakers crank out the sound, and the monitor is very bright. Now I've got to get the CP working.


While I'm preparing for the CP, I've taken measurements and am going to cut my own bezel to go in front of the monitor. I'm going to make it using black foam-board and then cover it with smoked glass which should reduce glare and make the games appear sharper.

Monday, December 31, 2007

Painting and T-molding done


Well, I didn't get to do much during the Christmas break, but New Year's Eve was productive.

Today I was able to get the t-molding on... what a pain. But it does look nice. t-molding.com was able to get me two matching rolls of Galaxian Green (the previous 2 rolls sent to me were slightly different) and I lucked out in that they are almost an exact paint match to the sides.

I also got the GGG LED bar installed and it is BRIGHT! My only complaint is the 3" of wire they give you and it's very thin gauge... but I can work with it. I had a 12V harness from another project (8 AA batteries) that I was able to hook up to it and test it out with the marquee in place.

Tomorrow, weather/wife permitting, I plan on getting the Luminglas mounted in the front hole, wire up the speakers, mount the marquee (picked up the L-shaped molding from Home Depot and need to spray paint black), and mount the SmartStrip inside the cab.

I'm debating working on the bezel first or jumping straight to the CP. I have to admit the CP has me a little frazzled as I'm not good with electronics or drilling straight/vertical holes. That said, if I ever want to play this thing, I'm going to have to do it sooner or later...

Happy New Year, all!

Jim

Tuesday, December 18, 2007

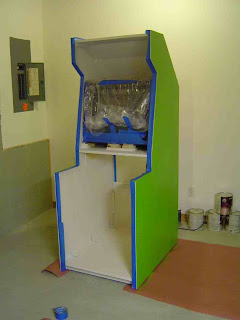
First coat of black paint on...


First black coat of paint is on... very thin, though. The foam roller still doesn't put much on the surface on the first coat... not really even the 2nd. It took 3 coats of the green before I started noticing a consistent color... an additional 2 coats before I was happy with it.


In the pic you can see the front of the cab with the circle cut out - that's where the green 12" Luminglas circle will be mounted... speaker panel is also being painted and to the right of the cabinet. I drilled some air holes in a nice little pattern on the top angled piece and you can see some blue tape on the back of the cab - that's a hole I cut out so I could access the monitor controls if necessary. I'm going to mount another speaker grille over it and it'll look fine.


I'm hoping to have the black coat completely done by this Saturday so I can put on the t-molding. After that, I'm going to mount the Luminglas, speakers, marquee, and get a monitor bezel completed. Then it'll just be the CP and PC.

Sunday, December 9, 2007

First 2 coats on the sides


This will be a two-tone cab, so I decided to start with the sides first - everything else will be black.


I'm using foam rollers which are working great BUT... I didn't realize the first coat would be so thin. The foam rollers definitely don't coat like a normal "fuzzy" roller for painting walls and such. After the first coat dried, I put on a second coat and the color really came out nice. I realize now that after sanding, it will probably take numerous coats to get the consistent color and smoothness. I'm not going for glass-finish, just smooth with no jaggies. (Definitely recommending the foam roller treatment to anyone preparing for this portion - the application looks nice and it doesn't have that textured look using 'fuzzy' rollers or brushes.)


Thursday, November 29, 2007

T-molding arrived


Got my order from t-molding.com in today - two 20' rolls of Galaxian green. I haven't decided yet if the sides of my cabinet will be painted an identical green or if I'll go a shade or two darker for contrast.

Saturday, November 24, 2007

Marquee received


Got all the putty done and the sanding and will be priming tonight. Hoping to get to the painting before Sunday. Also, my marquee arrived today from mamemarquees.com and it looks great. The cut is perfect, too. I haven't had a chance to test it yet but I want to prime the inside of the cabinet before I mount my LED strip.


Friday, November 16, 2007

2 new items ordered and received


I received two items today for my cabinet:


1. NovaMatrix™ LED Marquee Light - a bunch of super-bright LEDs that will light up the marquee from behind at the top of my cabinet.

2. TurboTwist 2™ Arcade Spinner Control - for games like Arkanoid, Tempest, etc.

That concludes all the items I need for the viewable area of the control panel. I've got my joysticks, buttons, spinner, and trackball. All that's left is the "innards" - control devices for handling the controls and sending the signals to the PC.

Sunday, November 11, 2007

Speakers installed and video/sound test

I'm learning that progress, for me, occurs in very small steps. I'm usually only able to do an hour or 2 (3 max) at a time on my cab, but now I can really start seeing the progress.

Today I got the speakers mounted and tested. Since I'm following the book closely, I ordered the Klipsch 2.1 system and the speaker grilles shown in the book. One of the images below shows the speakers mounted to the speaker shelf. Just like the book said, I had to countersink about 1/4" for the 1.5" screws to be able to grab. (I wasn't able to find 1.75" #6 screws like the book suggested.) This allowed the screws to grab and hold the speakers firmly. (And I've got to reverse the way I've mounted the speakers so the speaker cable is closer to the sides of the cab - in my haste, I missed that part.)

The good news is that the 8 screws I removed from the speakers were black and I was able to recycle them and use them to hold the grilles in place. No painting screws.

Finally, I hooked up the speakers and monitor to my laptop and tested the sound and video out. Everything looks awesome... and cranking the volume up to 8 gave me a Pac-Man experience I've never had before I can't wait to try out other games with these speakers.

Up next:

1. I've going to mount the front panel using barrel bolts (4) on the inside. If I remove the control panel, I'll be able to unlatch them and remove the front panel if I like. With the Luminglas mounted on front, I don't want the front panel to be able to open on hinges like a door. Using the barrel bolts will keep it locked in place but accessible anytime.

2. Filling in holes - I've got maybe a dozen or so holes to fill in and sand down before priming and painting.

3. Prime, paint, t-molding...

Saturday, November 10, 2007


Today I was able to cut down the speaker panel so it would fit properly above the monitor. I also started on my modification of the front panel. I long ago decided not to go with a coin door. I'm not building this for vintage accuracy and I don't want to rely on tokens (or a cheat button combo) to pay for a game. Instead, I've purchased a 12" diameter Luminglas circle (in green) that will be mounted flush from behind the front panel. A smaller circle (viewed from the front) will allow the viewer to see only the lightning effect and not the approx 1" clear edge around the effect.

There are 2 ways to do this, I've found out. The first is to cut out the inner circle first and then route out the back so the glass fits inside flush. The problem with doing this is once you cut out that inner circle, you've lost your center point to mount the little device that allows your router to cut a circle. The second method is to cut out the larger flush circle (about 3/8" deep into a 3/4" panel) so you keep your center point. The problem with this is that once you clear out the inner circle, there's not much wood left for the device used to cut a circle to rest on and stay flat with the wood. (This probably isn't making sense unless you actually see it).

I went with the second method, figuring I'd find a way to cut deeper into the smaller, outer circle. Long story, short - I did a little tweaking and used a longer pivot point nail, extended the router bit deeper into a second board clamped to the bottom of the front panel and I was able to get a perfect front circle.

Attached are some images... the lightning effect looks great in person. It looks washed out in the picture, but is very bright even in a lit room. I haven't actually mounted it to the rear of the front panel yet so it might look a little off center but I'll fix that.


Up next:

1. Wood putty all the holes on the cab in prep for priming.
2. Mount the speaker shelf using an alternative method from the book (I can't use braces underneath so I'll go above)
3. Mount the front panel
4. Order my marquee
5. Mount LCD light behind marquee area (I've ordered one)

Thursday, November 8, 2007

Marquee design


I've got a friend who's wife is a graphic artist and she's helping me to fine-tune my marquee, sideart, and CPO. This isn't the final marquee image, but it's getting there as we make little changes here and there. She took my original concept and greatly improved it - I love her version of the saucer and the "burning" effect applied to the lettering is very original and somethign I would never have thought of...

The biggest change? I've changed the title of the game from "Saucer Invasion in Sector-J" to simply "Saucer Invasion" - sounds more arcade-y anyway. The image here is low-resolution but the hi-res colors look much better.

What am I working on now? Well, I've managed to cut some small wooden pieces to raise my monitor in the front, providing it with a suitable angle for viewing by 2 players. Now that I've got the angle done correctly, I can move forward again. This weekend, I hope to get the following done:

1. Cut the speaker shelf down to size and test out placement of speakers and make certain they don't interfere (magnetically) with the monitor image.

2. Special Effect woodwork for the front panel. I have decided NOT to go with a coin door but have instead found something else I want to try. I'll hopefully have some pictures this weekend of my attempt.

3. If 1 and 2 get done, I plan on starting with some priming and sanding. Painting won't happen this weekend, unfortunately.

Saturday, October 27, 2007

Monitor installed...


Later this afternoon, I got the L-brackets installed for the monitor shelf... I also followed Saint's book advice and drilled from the outside cab sides into the support braces and put in a substantial amount of screws to keep those braces from falling... and the monitor.


Monitor is installed, but...


1. Speaker shelf is too long... will need to trim it quite a bit.


2. The monitor needs to be angled upwards a little... will need to experiment with placing some scraps wood underneath the front of it.

Got my monitor...


I've been having trouble deciding between an LCD or a monitor. Add to that the fact that the width of the inside of my cab is 26" and all of the 27" TVs I've found are slightly too wide. So, I decided to go a little smaller. Turns out that 25" LCDs are difficult to find in 4:3 Ratio... they all seem to be widescreen format these days.


Some more digging on craigslist.com found me a 25" Sony monitor. This thing is a monster... very heavy. The dimensions work (I'll have to cut some of the back off my speaker shelf, but no biggie) and the picture quality is outstanding. I connected my laptop and ran a few games on it to see and I'm definitely happy with this choice.

Now, I've got to reinforce the monitor shelf some more... did I mention this thing is HEAVY?!

It remembers its settings when power is lost and has just about every type of video input on the back (see image). No speakers built-in, but that's what the Klipsch 2.1 system is for...