Saturday, February 2, 2008
Wednesday, January 2, 2008
Test Run
Monday, December 31, 2007
Painting and T-molding done
Well, I didn't get to do much during the Christmas break, but New Year's Eve was productive.
Today I was able to get the t-molding on... what a pain. But it does look nice. t-molding.com was able to get me two matching rolls of Galaxian Green (the previous 2 rolls sent to me were slightly different) and I lucked out in that they are almost an exact paint match to the sides.
I also got the GGG LED bar installed and it is BRIGHT! My only complaint is the 3" of wire they give you and it's very thin gauge... but I can work with it. I had a 12V harness from another project (8 AA batteries) that I was able to hook up to it and test it out with the marquee in place.
Tomorrow, weather/wife permitting, I plan on getting the Luminglas mounted in the front hole, wire up the speakers, mount the marquee (picked up the L-shaped molding from Home Depot and need to spray paint black), and mount the SmartStrip inside the cab.
I'm debating working on the bezel first or jumping straight to the CP. I have to admit the CP has me a little frazzled as I'm not good with electronics or drilling straight/vertical holes. That said, if I ever want to play this thing, I'm going to have to do it sooner or later...
Happy New Year, all!
Jim
Tuesday, December 18, 2007
First coat of black paint on...
Sunday, December 9, 2007
First 2 coats on the sides
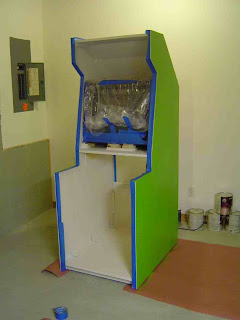
This will be a two-tone cab, so I decided to start with the sides first - everything else will be black.
I'm using foam rollers which are working great BUT... I didn't realize the first coat would be so thin. The foam rollers definitely don't coat like a normal "fuzzy" roller for painting walls and such. After the first coat dried, I put on a second coat and the color really came out nice. I realize now that after sanding, it will probably take numerous coats to get the consistent color and smoothness. I'm not going for glass-finish, just smooth with no jaggies. (Definitely recommending the foam roller treatment to anyone preparing for this portion - the application looks nice and it doesn't have that textured look using 'fuzzy' rollers or brushes.)
Thursday, November 29, 2007
T-molding arrived
Saturday, November 24, 2007
Marquee received
Got all the putty done and the sanding and will be priming tonight. Hoping to get to the painting before Sunday. Also, my marquee arrived today from mamemarquees.com and it looks great. The cut is perfect, too. I haven't had a chance to test it yet but I want to prime the inside of the cabinet before I mount my LED strip.
Friday, November 16, 2007
2 new items ordered and received
Sunday, November 11, 2007
Speakers installed and video/sound test
Finally, I hooked up the speakers and monitor to my laptop and tested the sound and video out. Everything looks awesome... and cranking the volume up to 8 gave me a Pac-Man experience I've never had before I can't wait to try out other games with these speakers.
Up next:
1. I've going to mount the front panel using barrel bolts (4) on the inside. If I remove the control panel, I'll be able to unlatch them and remove the front panel if I like. With the Luminglas mounted on front, I don't want the front panel to be able to open on hinges like a door. Using the barrel bolts will keep it locked in place but accessible anytime.
2. Filling in holes - I've got maybe a dozen or so holes to fill in and sand down before priming and painting.
3. Prime, paint, t-molding...
Saturday, November 10, 2007
Today I was able to cut down the speaker panel so it would fit properly above the monitor. I also started on my modification of the front panel. I long ago decided not to go with a coin door. I'm not building this for vintage accuracy and I don't want to rely on tokens (or a cheat button combo) to pay for a game. Instead, I've purchased a 12" diameter Luminglas circle (in green) that will be mounted flush from behind the front panel. A smaller circle (viewed from the front) will allow the viewer to see only the lightning effect and not the approx 1" clear edge around the effect.
1. Wood putty all the holes on the cab in prep for priming.
2. Mount the speaker shelf using an alternative method from the book (I can't use braces underneath so I'll go above)
3. Mount the front panel
4. Order my marquee
5. Mount LCD light behind marquee area (I've ordered one)
Thursday, November 8, 2007
Marquee design
I've got a friend who's wife is a graphic artist and she's helping me to fine-tune my marquee, sideart, and CPO. This isn't the final marquee image, but it's getting there as we make little changes here and there. She took my original concept and greatly improved it - I love her version of the saucer and the "burning" effect applied to the lettering is very original and somethign I would never have thought of...
The biggest change? I've changed the title of the game from "Saucer Invasion in Sector-J" to simply "Saucer Invasion" - sounds more arcade-y anyway. The image here is low-resolution but the hi-res colors look much better.
What am I working on now? Well, I've managed to cut some small wooden pieces to raise my monitor in the front, providing it with a suitable angle for viewing by 2 players. Now that I've got the angle done correctly, I can move forward again. This weekend, I hope to get the following done:
1. Cut the speaker shelf down to size and test out placement of speakers and make certain they don't interfere (magnetically) with the monitor image.
2. Special Effect woodwork for the front panel. I have decided NOT to go with a coin door but have instead found something else I want to try. I'll hopefully have some pictures this weekend of my attempt.
3. If 1 and 2 get done, I plan on starting with some priming and sanding. Painting won't happen this weekend, unfortunately.
Saturday, October 27, 2007
Monitor installed...
Got my monitor...
I've been having trouble deciding between an LCD or a monitor. Add to that the fact that the width of the inside of my cab is 26" and all of the 27" TVs I've found are slightly too wide. So, I decided to go a little smaller. Turns out that 25" LCDs are difficult to find in 4:3 Ratio... they all seem to be widescreen format these days.
Now, I've got to reinforce the monitor shelf some more... did I mention this thing is HEAVY?!
It remembers its settings when power is lost and has just about every type of video input on the back (see image). No speakers built-in, but that's what the Klipsch 2.1 system is for...
Tuesday, October 9, 2007
Speakers arrived... and grills

Saturday, October 6, 2007
More work on the cabinet, part 2
Today I did the work required to mount the speaker panel and monitor panel. I installed the support pieces (hot glued to the side and pre-drilled before gluing them in). Those are visible in the first photo. They follow the angle of the that top edge.
The speaker panel was a tight fit and required some serious sanding to get it to fit.
The most difficult part here was just checking my measurements to make certain I had the templates placed properly. There's a limited amount of space for mounting the speakers so they don't interfere with the glass screen protecting the monitor.
Used a large drill bit to drill starter holes in each corner so I could get the saw blade going.
Need to buy a small flourescent light to mount inside the marquee area at top and start shopping for the monitor/LCD panel I want to put inside.
Tuesday, October 2, 2007
More work on the cabinet
The clamps in the picture were being used to hold the upper back panel in place until I could properly connect it to the sides of the cabinet (see picture below for notes on this step).
The gap you see there will be for access to the computer and inner components of the arcade cabinet. I haven't decided if I'll hinge the front door of the cabinet or not. There are some advantages and disadvantages.
What you're seeing here is a closeup of the mounting of the back angled panel and the upper back panel. I used these small pieces of wood as braces. I use a hot glue gun to attach them after I've pre-drilled them.
Everyone does things a little differently, but what I do is pre-drill the pieces first - I drill 2 or 3 holes in the side and these will allow me to place screws into the sides of the cabinet. I also drill 3 or 4 holes in the edges and these allow me to place screws into the angled panel and back angled panel (see next image for closeup).
Pre-drilling works for me because it's very difficult to drill those holes after gluing the piece in place. My electric screwdriver is small enough for me to get in there and tighten the screws down but the drill is too bulky.
Saturday, September 22, 2007
Back to the project...
Last weekend, I cut the slot for the t-molding on both sides of the cabinet and mounted the cabinet sides to the base. This weekend I did some more work on mounting the top of the cabinet and the lower back panel. I'm following St. John's book VERY closely. Where the book may lack a detail or 2, I've been able to go to the byoac.com website and find the answer. There's a project there called "Mars Invasion" that follows the book closely, too. That project has a lot of pictures that have answered questions of mine.
Here are some photos of the work so far.
I didn't have a helper for this portion so I used my step ladder along with some scrap pieces of wood to prop up one end of the cabinet side until it was level. Then I clamped everything in place before drilling.
Here are the two sides mounted. They're wobbly, so I followed the book's instructions and used some L-brackets to secure them a little better.
Tuesday, July 10, 2007
Don't forget the arbor
Sunday, June 24, 2007
Slot Cutter for T-Molding
In the image, the distance B is the 1/16 edge that will cut into the plywood.